Posts

PowerApps - Restrict a Text Box to 2 decimals

 One of my project got a requirement to restrict the Text box to 2 decimal point. By default PowerApps not giving the option to restriction option. But we can do that using the formulae using the steps below. Update following commands in "On Change" event of the Text Box. UpdateContext(    {        texBoxValue :        Round(          Value(Self.Text),          2       )    } ); Reset(Self)  Update variable in "Default" of the Text Box.                          texBoxValue Hope this helps.

Submit as template in Power Automate

Image
 Power Automate flow will have the ability to save the flow as template in Power Automate Gallery. This will help the users to re-use the template once the Power Automate team approve the flow to publish in the Gallery. We can use the steps to create the template.  Navigate the flows. Click on Details in the flow as below Click on Submit as Template on the Top navigation as below. To submit the template, low must run at least once. If flow not ran anytime, we can see the error.  If flow ran at least once, it will navigate to following screen. Provide Name, Description, Benefit, Number of Users, Number of Runs and Category details. and Click on Submit. Once Submit the details, Power Automate Team will review the template and updates in the Gallery.

Create Flow using the Microsoft Visio

Image
 We can create the flow using the Microsoft Visio using Power Automate tool. We can create the flow using Visio template as shown the steps below, In Power Automate portal, Click on Templates. On the Top Menu, Click on Visio as below. Click on the BPMN Diagram. It will open the Visio designer. Add the actions to the visio Once completing the design, on the "Process" Tab, click on "Prepare to Export" button. Visio will open Prepare to Export group. We need to map the actions accordingly. once all the actions mapped, Export the Visio to Power Automate.

Model Driven App Send-in Notifications

Image
In Model Driven app, Notifications can be stored in Notification table and we can see the notifications in the notification area. We can see all the notification until we dismiss the notifications or notifications expired. By default it is set to 14 days and admin can override the notifications expiry settings. By default notifications set to Owner. But if there is any users to to be set, we need to add the users in the owners list.  To enable the app-in notifications we need to follow the steps below, Open Power Apps portal, Open Model Driven app Edit the Model Driven App. Click on "Settings" on the top. In Features section,  Enable "In-app notifications" shown below. Click on Save and Publish the app to see the notifications.

ConfirmExit and ConfirmExitMessage in Power Apps

Image
ConfirmExit and ConfirmExitMessage functions allow us to not lose the changes made in the Power Apps form. Using the functions we can warn the users not to lose the changes made in the app. ConfirmExit is a Boolean value. By Default the value is false. When it is true, the alert pop-up will appear in the screen. We can use the ConfirmExit when user updated the details in the form and not Saved the changes. We can validate the changes saved or not saved using Unsaved property in the PowerApps. We can use the ConfirmExit on following cases, While using Exit function on button click If we are using app in browser and user try to click on Back button in the browser or Back icon in the mobile app If we are using app in browser and user try to close the browser window. while using ConfirmExit, we can use ConfirmExitMesssge to pass the Message to the end user in the PowerApps. We can call the ConfirmExitMessage by passing the custom message 

Model Driven App Issue - Opening other forms instead of quick form create

Image
While working with Model Driven app, I got an issue with quick create item. When i try to create an item, i see different form instead of the form i have expected to create. After verifying the logs i found following details in the logs. I have filtered the app with FormChecker category I found the reason for the issue in the logs as below. "The Entity is not enabled for quick create. Contact the entity owner to enable it." To enable the Quick create we need to follow the steps below. Open PowerApps portal. In Data Section, Click on Tables as below. Select the Table and Click on Settings on the Top Right as below. Select Enable Quick Create Forms options as shown below. 

Canvas App - Debugging options

Image
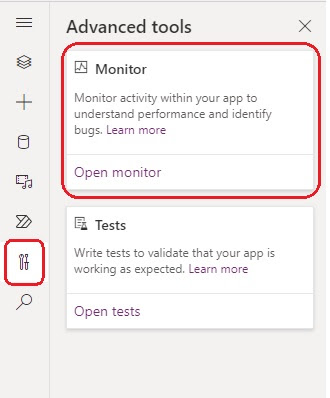
Canvas apps debug can be done using the Monitor option. With Monitor we can track the events trigger in Canvas app using authoring experience or track the events in published canvas app.  We can get monitoring using the steps below, Open Portal.Office.com Open the power app. Click on Tools in Advanced settings. It will open the app statistics page as below. In the Dashboard, we will have Invite and Options as shown above.  We can also monitor the published app as shown the steps below. By Clicking on the Monitor we can see the dashboard as shown below.

Power Automate - Get File(s) Action not returning results

Image
While working with Get Files action in SharePoint, i am not getting any results. In my request i am trying to get the files using the folder name. By passing the folder name dynamically i am not getting any values to the result. I tried to pass the folder name manually but i didn't get the results. Tried to get the results without passing the folder name. Now i am able to get 100 items.  i found the reason for the issue. By default Get Files action will get only 100 records. But my Document Library having 9500 records. My Filer folder is running only on 100 items and not getting any results . So i am not seeing any results with default settings. To fix this issue, we need to set enable Pagination and set the values using the steps below. After setting the Threshold values, Click on Done to save the pagination value.  After running the file i am able to see the filtered results.

Canvas App - Debug Published app setting

Image
We can enable debugging Canvas app by enabling the "Debug the published app" in Canvas app setting. This setting will allow users to generating the expressions in the app. Even the setting is off, we can see the events happen to the app.  We can enable the setting using the steps below. Open Canvas App in Edit mode Click on File -> Settings -> General  We can see the Events happened in the app using the "Monitor" option in the app.

Model Driven App - Check user details and Access details

Image
As a user we can see the user information details about the user and organization. In the the page, we can see the contact information and security role about the user and organization. Users can have the option to change the details based on the role. (i.e. if user role is Read, user cannot have the ability to change the details). We can see the user information using the steps below. Open Model Driven App, Click on settings Icon on Top right and click on "Personalization Settings"  It will open the pop-up. in the pop-up, click on General tab as shown below. Click on "View your Information". It will open the User Information page. In the Administration tab we can see the user permissions as below.  

Power Automate - Securing Inputs and Outputs

Image
How can we handle the secure information in Power Automate? i.e. i need to pass the Sensitive information and users cannot see it in the logs. To manage that, we can use Secure Inputs and Get Secure from Azure Valut. To enable Secure Inputs, Click on three dots on the top and click on Settings as below. Click ok Done. This will omit the results from the logs. Similarly there is another option using the Secure Key in the actions list as below.

How to send dynamic attachments in a email using Power Automate

Image
 We can send documents get from SharePoint or other sources and send as attachments in email. In my case, I need to get the SharePoint document based on the id and convert to PDF. Once we convert to PDF, need to send the PDF document as attachment in a email. To get the SharePoint document, I have used Get File Content method to get the file content. Once we get the content, Using One drive convert method, convert the file to PDF. (before conversion, we need to create same file in One drive using Create File Method). Once we get the file content, we can send the file as attachment in the attachment section as sown below. We can also pass the JSON instead of passing the attachments. We can use this option if we have the array configured already. 

Convert HTML to Text in Power Automate

Image
We got a requirement from the customer to automate the server status details. There ill daily email alert trigger from server to Shared email box. We have created a flow based on the email alert triggered to Shared mail box as below Based on the Subject, Trigger will identify the email. In the trigger condition we have mentioned not to trigger if the Subject contains RE or FW. Once we get the email to extract the content, using HTML to Text conversion action. In HTML to Text conversion email text will convert to string. Once we get the string i am using the string options to extract the required text and converting the string to JSONformat by applying the loops.

Concurency Control and Degree of Parallelism in PowerAutomate

Image
Concurrency control and Degree of parallelism are the options available in Power Automate triggers and Apply-each controls. Using Concurrency Control option, We can control number of flows to run in parallel. Without enabling the concurrency control, power automate can trigger multiple instances of a flow. But enabling the concurrency control we can mention number of instances to trigger and run in parallel. If we trigger multiple flows they will be in waiting stage. To enable PowerApps Concurrency control, select Settings and click on Concurrency control as below. After enabling the Concurrency control, there will be Degree of Parallelism option. This will allow how many flows to trigger at parallel.  In the above case, only 25 instances can run in parallel. If we get more than 25 instances they will be waiting status as below. Similarly we can enable Concurrency Control for Apply-each and it will run parallelly. 

Active Screen in PowerApps Canvas App

Image
 PowerApps Canvas app will have App property will have different properties. ActiveScreen is one of the property in PowerApps App level. ActiveScreen property will following properties, Name ContentLanguage Orientation BackgroundImage Fill Height ImagePosition LoadingSpinner LoadingSpinnerColor Printing Size Width We can set the screen color based on the ActiveScreen name. We can change the field types based on the current screen. We can set the Screen background using the formulae below. If(App.ActiveScreen.Name = "Screen1",Gray,Tan)

Update look-up column types in Data verse using flow

Image
In Data verse power automate, we don't have direct option by passing the value to the field. We need to pass the Table with Id of the column. For Instance i have Table A and I am trying to update the Lookup column in Table  B, we need to pass the id of the Table A column. For Example we have Loans Table and referring loans table inside of the other table as a lookup column. to Update the Lookup column, we need to pass the value of the Loans as shown the image below. Similarly we can update the other columns like Owners based on the System Users as shown below.  

Custom Links in Approval flows

Image
 We can add custom links in the approval flows using the formulae. We can add the links using following formula in the approval email. [Go to Link](http link) Here are the steps i have used to send the email with the link. I have added the Approval mail and in the Description i have added the link as below. We can see the email in the output as below. Similarly, we can add dynamic links to the approval flow by using compose action and adding it as output to the approval link.

Clear option for PowerApps Text Box

Image
 PowerApps allowed to clear the Text Box value while entering/Selecting the Text Box value. For Text Box We have Property "Clear" for the Text Box. Clear Property can be applied through left top Clear option or Right Properties pane as shown below. By updating Clear button option we can see the "Cross" icon as shown below.

Update file name is a SharePoint document library folder

Image
One of my projects, i got a requirement to change the file names in SharePoint document library folder. We can update the document name using the steps below. Get SharePoint files in a folder using the Fet SharePoint files action below, On each file update the file name using Send HTTP action with following details. Site Address : <<Site Address>> Method : Post Uri: _api/lists/GetByTitle(' <<Document Library Name>> ')/Items( <<ITEM ID>> ) Headers: Content-type: application/json IF-MATCH: * X-HTTP-METHOD: PATCH Body: {'__metadata': {'type':' <<SharePoint Document type>> '}, 'FileLeafRef':' <<File Name to be Updated>> '} We can get the type of the document in the body, (for me it is  SP.Data.Shared_x0020_DocumentsItem) by accessing the api URL and check for the "term" in the url as below.

Flow - Determine the event type in Data verse table

Image
Using CDS connector we can trigger the flow based a event trigger in the Data verse table. Based on the determine the event fired in a data verse we can determine the actions to be performed in the data verse. While creating the table, we can choose the Change type as below.   To determine the type of the event, there is a property in called SdkMessage. We can get the property values using the expression. We can get the values from SdkMessage as “Create”, “Update” as below.   We can get the SdkMessage using the expression below. Based on the type of the event, we can determine the actions .