Posts

Power Automate Tip #15 : Flow instance URL is Key for logs
Image
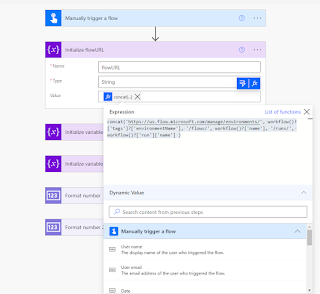
When you handle exception (read the post that talks about handling exception), you log your way (either on a list) or email yourself but then you need to know which instance failed. The 28 day history could be a BIG long list and it could be hard to find which instance that you are looking for. Here is the expression that you could use to get the flow URL.  concat( ' https://us.flow.microsoft.com/manage/environments/ ',  workflow()?['tags']?['environmentName'] , ' /flows/ ',  workflow()?['name'] , ' /runs/ ',  workflow()?['run']['name']   ) When you use this expression, the output would look something like this. Log this and use it to get back to the instance any time.

Power Automate Tip #14 : Handle Error

Image
 As you know Power Automate have plenty of connectors and some are third parties and they respond back with your expected result or maybe with some error message stating something is wrong. Sceanrios where we may need to handle two different things on success and on failure. Lets say we call a Adobe Compress to compress a PDF. The adobe typically sends back the compressed PDF content if the compression is successful. Check the use case here . 1. Scope the activity where you are making the call 2. Make a parallel step and use one for success and another for failure 3. On the success branch, overwrite the file (the compressed version) 4. On the failure, extract the output message and log it.    

Power Apps - Restricting the Text Box only Whole Numbers

Image
 We can restrict the a Text box to allow only number by making the Format TextFormat.Number as below.  But this will allow decimal Number. We can restrict the Text Box to allow only whole numbers by writing the formulae for the TextBox Onchange as below If(     DataCardValue1.Text <> "" And Value(DataCardValue1.Text) <> RoundDown(         Value(DataCardValue1.Text),         0     ),     Notify("Please enter number without decimals");     Reset(DataCardValue1) )

Power Automate Tip #13 : 28 Day Run History

Image
 Please do bare in mind the flow run history won't last more than 28 Days. This is as per GDPR requirements and you should make sure you download the history of it every 28 days.  There is an option to download the previous 28 day runs when you click the 'All Runs'. By clicking the 'Get .csv file' you should be able to download the flow run history. Looks something like this. Run link gets you the flow run.

Power Automate Tip #12 : Use Solution

Image
One of the best practice to create flows is to create it under a Solution. This is going to be extremly helpful if you like to govern your flow from Dev to Test and to the Production environment. Scenarios where IT Consulting companies build the flows for their clients should take advantage of this feature where they could easily create a solution and package it and export,  import the entire solution including connections (substituted to the customer's connections) into the Customer's environment.  Create new solution by clicking the 'New Solution' and build your flows under it. All the connections you build on the flow will continue to stay on the solution so its easy for you to package. You can export the solution by publishing the solution, check for issues and you can port it as a 'Managed' Environment for Taking it to Production or take it as a Unmanaged version if you think you could take it to a source control. A zip package will be downloaded and you ca...

Power Automate Tip #11 : Share Your Flows Export and Import

Image
 You have few options to share your flow.  1. You want someone to work on the same capacity as you are, make them as a co-owner. 2. You want to send a copy of your flow in which case you have to select the 'Send Copy' and choose the appropriate person to whom you like to send a copy of it. Once that person consents after getting the email, a flow should be re-created for that user. The best thing is all connections will be run on that user account.  3. You cna also export the file as a Zip package by clicking Export.

SP 2013 Workflow Instance Suspended : There has been an error authenticating the request

One of my customer are still on Old 2013 on-prem Provided App hosting model and every now and then, the workflow instance chokes and gets suspended with an error message 'There has been an error authenticating the request'. This is very annoying and there is nothing you could other than recycle the  SecurityTokenServiceApplicationPool   application pool in IIS, And then you have to go to individual failed instance and Terminate and resubmit all suspended workflows. RequestorId: 847a8tdb-8a23-bc5a-0000-000000000000. Details: An unhandled exception occurred during the execution of the workflow instance. Exception details: System.ApplicationException: HTTP 401 {"error_description":"The server was unable to process the request due to an internal error. For more information about the error, either turn on IncludeExceptionDetailInFaults (either from ServiceBehaviorAttribute or from the configuration behavior) on the server in order to send the exception information bac...

Power Automate Tip #10 : Validate your flow or Testing your Flow

Image
 Lot of times you could notice a flow can fail for a specific run, specific data or specific scenario. The good thing is the flow records it, However if you need to modify and need to test the same data, Its hard for your to trigger the same scenario. To ease this MS have given a way of resubmitting a run that failed. There is an option called Test on the top right side of the flow. This have two options Manual and Automatic. By choosing manual you may need to manual do the trigger condition by updating or uploading (based on what your trigger condition is) to test the flow. By choosing Automatic, you can go to one of the recent runs you did that failed and test the flow run post change. This is a fantastic feature starting to finish - start building a flow to Final flow version. 

Power Automate Tip #9 : Parallel Branching

Image
Parallel branching is helpful if we have actions that can run independently which in turn reduce the flow runtime. Nobody wants our flow to run for a long time. So, this is one way by which you can reduce time. Make sure there is absolutely no dependency between these parallel actions. Instead of adding an Action, you can do the 'Add a parallel branch' which will create a parallel activity branch where you can run your independent actions. Lets say if we like to do two independent actions - 1. To email the Yearly Budget and 2. Send out the VP's number to a Teams chat. We can do that as shown below :

Power Automate Tip #8 : Format Number

Image
 This is a cool new activity feature that does the formatting for you. You can  use this activity to format the numbers/Variables to a desired format. You can pick one of the 3 available formats or you cna pick up a custom format. For the below example, lets take an Yearly Budget and a USA Phone number. You could format this as shown below.  The output would look something like the below.

Power Automate Tip #7 : Note, Commenting your Activity

Image
 There is nothing intelligent in this post, its more abut good practices. When you write an acitivity you make sure you name it right so its easy for you to decode the logi. Its not just you, anyone who is reviewing is going to get a handle of it right away. If you like to learn more about renaming, see this post . Now lets say if you need to write a descriptive comment on a complex logic, then we may need more real estate for commenting, thats when you use the note. Its a simple step, click on the Activity and Click 'Add a Note' option something as shown below and you should be able to get your comments in place. Hope that helps.

Power Automate Tip #6 : Name it Right

Image
 Renaming the activity is like commenting your code. It would take probably 10 extra seconds for naming your activity appropriately. This will save a ton of time when you are in the process of debugging or decoding the logic during adverse times. For the simple flow that runs ' Runs at 6:00 on Monday every week'  and extracts the members of an Office group and email the details, looks like this. It will look much better if the activities are renamed as per the logic. Please do understand you ca write big comments on these activities which will cause trouble when you are trying to use the output of this on to expressions. If you like to use bigger comments, you may need to use the 'Add a note' option. Learn more about 'Add a note' in another tip written here .

Power Automate Tip #5 : Use Clipboards Effectively

Image
 A lot of times there is always a need to make a copy of a flow activity on to another flow or even to another tenant. Building this from scratch is a pain or I would consider that as a duplication of effort. So, the best feature that I would recommend is to use the Clipboard. This feature is on preview. If you click the three dots on the activity, you should see an option to 'Copy to my clipboard'. Once you copy, you can create a new activity either in the same flow or another on the same browser session and try to use the copied clip and use it on to your flow by going to the 'My Clipboard'. If its another browser session, you can past it on a notepad which would looks something like this. You can select all and cut the json and past it on the My Clipboard area so you could get back the action. Simple, easy and I love the fact that it saves a lot of my precious time

Power Automate Tip #4 : Experimental Features

Image
 The Experminetal features for your Power Automate Settings are of great use. To enable this, Go to Settings>View All Power Automate Settings and Turn On Experimantal Features and click SAVE. Please refer to Microsoft post for more details - https://docs.microsoft.com/en-us/power-automate/experimental-features One of the feature I like about is the real estate that we have for keying in your expressions.

Power Automate Tip #3 : Trigger Conditions

Image
One of the best practices is for you to govern your flow/power automate runs. One of the way to do such thing is to use the Trigger Conditions. For the same example I used before - I would like to take the files that are not already compressed. The very first thing you need to do is to click the settings of your Trigger. In my case its the When a file is created or Modified on the SPOL library.  In my case, I would like to have two conditions,  1. I am compressing the PDF's and nothing else. 2. The Compressed value should not be True If you see above thats how I can set the above conditions using Regular Expressions. Hope thats helpful!

Power Automate Tip #2 : Use of Compose & Parse JSon

Image
I am going to use the same use case (compressing the PDF using Adobe) that I used in my previous post and show how we extract the error message that's thrown by the Adobe Compress Plugin. Compose is a very powerful action in Power Automate.  The result of the Adobe Compress looks like this when there is a failure To extract the appropriate field, you have to compose the result that comes out of the Adobe and use the ParseJson which parses the Json so its easy for you to extract the appropriate property. It has to be a step by step procedure.  1. You have to do the Compose and make a run. 2. Extract the Output and use it on the ParseJson Action. Use Generate from Sample and paste your Compose output from the previous run. 3. Now you should see these attributes available to be used in the subsequent steps as you see below

Power Automate Tip #1 : Use Scope

Image
There are occasions where your flow breaks at a specific step and you may notice the flow run fails entirely which means you may end up troubleshooting the flow run periodically. Scope is an action that covers the specific step or a sequence of steps and you could capture the failure of these steps so you could perform the appropriate actions based on the success or failure. For instance, here is an use case where I would like to compress a PDF file once uploaded on to a SharePoint library using Adobe Compress and set the Compressed field to Yes so it doesn't try to compress again. Lets say if someone uploads a file that's already compressed, it will throw an error at the Compress PDF and there wont be any log of it.  The better way to handle is to do the following : 1. Use a Scope and make a parallel activity (One configured run after - has failed of Scope and another is successful with the success activity) 2. On the success, do what you need to do on success 3. On Failure, ...

Power Automate UseCase : Compress PDF & AI files

Image
One of my customer's graphic team use heavy PDFs and they also gather these Proof heavy PDFs from third party vendors. Storing all these as-is not so optimal in the SPOL library and it takes time to load, share and annotate. The quickest solution that I could think of is to use the Adobe Power Automate plugin  and compress the PDFs as soon as it gets uploaded. Having a column called 'Compressed' and set it to true on successful compression helps redundant run of the flow.  The first trigger has to have some kind of trigger conditions so it just compress PDF files and also if the Compressed column is not true. Remember, Adobe compress throws an output error if you pass the compressed file. Also, you don't want to make a call and lose the credits.  Next, Get the file Content and pass it on to the Compress PDF. Follow the above help link to how to get the ClientID and set up the plugin. The output of the Adobe Compress activity is your compressed file content. However you...

PowerApps - Merge Two Collections in to one Collection

In PowerApps, we can merge two collections in to one collection based on the unique value in the two collection. I had a requirement to merge two collections format as below, Employee Unplanned Leaves Data List - Collection 1 Employee ID  Employee Name  Employee Leave Date Employee Leave Applied Date Employee Unplanned Leaves Employee Planned Leaves Data List - Collection 2 Employee ID  Employee Name  Employee Leave Date Employee Leave Applied Date Employee Planed Leaves These are two different collection and we need to merge these two items based on the employee id. I have used following formula to merge the collections ClearCollect(     OutputCollection,     Collect(              AddColumns(                                       collection1,                       ...

PowerApps - Back to Basics - With function

With function in PowerApps allow to simplify the complex formulas in to smaller functions. This will enable us to calculate the value or perform the operations as per the requirement. We can pass the Record or reference field names or named vales. Named values will work as variables with in the scope. Syntax for With, With  (          <<Record>>,          <<Formula>> ) Real Time Usage -  One of project, i need to filter the list based on Created Date and Created By user. Created Date = Today() Created By = User Logged in to the System. I have used following formula to achieve the functionality, With(    {       myList:       Sort(          <<Source List>>,          Created,          Descending       )    },    LookUp(   ...